


Z-Wave Mesh Network Design: How to Build a Strong, Reliable Network
A Z-Wave network is more than a list of devices; it’s a living structure. When designed well, it feels invisible – everything just responds. When designed poorly, you get slow switches, missing sensor reports and random glitches.
The good news is that building a strong Z-Wave mesh is not complicated. It’s mostly about a few clear principles: use enough mains-powered devices, place them smartly and let the network adapt. In this spoke, we’ll walk through how to do exactly that with Homey Pro at the center.
Understanding the Mesh Backbone
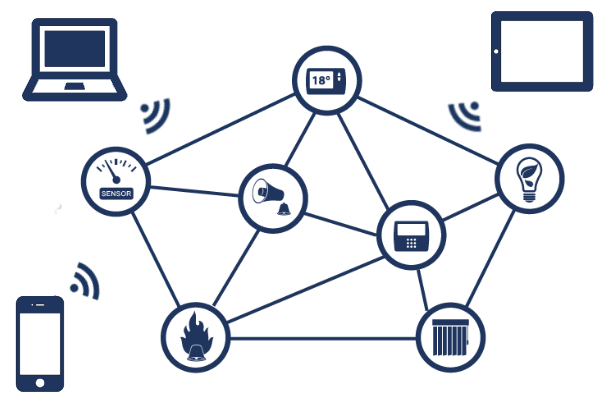
A Z-Wave mesh is built from two kinds of devices: repeaters and non-repeaters. Mains-powered Z-Wave devices stay awake and forward messages; battery-powered devices mostly sleep and conserve energy.
You can think of repeaters as the “roads” of your Z-Wave city. Sensors and other battery devices are like small cars that use those roads to reach Homey Pro. If the roads are few and far between, traffic gets stuck. If the roads are dense and well-connected, traffic flows easily.
A strong mesh backbone usually means having enough Z-Wave plugs, in-wall switches or other powered devices placed throughout your home, not just near Homey itself. This allows the Z-Wave mesh to optimize routing to your controller, making sure no devices get lost.
Building Your Network From the Inside Out
A resilient Z-Wave mesh starts at the heart of your home. To build the most reliable connection, always begin by pairing the mains-powered devices closest to your Homey Pro first. By working in concentric circles outward, you ensure that every new router you add has a direct, high-quality link to the controller or a nearby neighbor that is already part of the established backbone.
Once your infrastructure of plugs, dimmers, and in-wall switches is fully powered and connected, you can introduce your battery-operated end devices. Always pair these sensors and remotes in their final intended locations. This allows the device to instantly identify the best "parent" router in its immediate vicinity, ensuring that the very first message it sends has a clear, reinforced path back to the hub.
Planning Coverage: Floor by Floor
The simplest way to plan your network is to think in floors and zones rather than individual devices.
On each floor, aim for at least one or two good, central routing devices. In a compact apartment, one Z-Wave plug in central sockets might be enough. In a larger house with multiple rooms per floor, it often helps to have routing devices in key locations like hallways, living areas and open staircases.
Vertical coverage is just as important as horizontal coverage. If Homey Pro is located on the ground floor, a smart plug near the stairs can help signals travel upwards to devices on the first floor or attic. Similarly, a powered device in the utility room or garage can improve communication to motion sensors in those areas.
Network Healing and Optimization
A Z-Wave mesh is never truly static. While initial placement is important, the network uses a process called "healing" to discover the most efficient paths for data to travel. As you add more mains-powered repeaters, your Homey Pro and the existing nodes collaborate to map out better, faster routes.
This dynamic optimization means your mesh becomes more resilient as it grows. If a specific routing device is moved or powered down, the surrounding nodes will eventually detect the change and reroute traffic through the next best available neighbor. This self-correction prevents individual device failures from bringing down the entire system.
To get the best performance, you should allow the network time to settle after making major changes. If you notice a sensor is sluggish after you have rearranged furniture or added new plugs, you can often trigger a manual heal for that specific device via the Homey developer tools. This forces the node to re-examine its neighbors and find the strongest signal path back to the controller.
Dealing With Problem Areas
Every home has tricky spots: a concrete stairwell, a garage behind thick walls, or a basement laundry room. In these areas, signal can be weak, but there are straightforward strategies. Adding a single Z-Wave plug or in-wall switch in a nearby, less shielded location can dramatically improve connectivity. Often, one device in the right corridor or halfway zone can “bridge” into a problem area.

If you still have issues, consider whether the environment has heavy interference (large metal objects, electrical panels) and see if you can move either the routing device or the sensor slightly. A shift of half a meter can sometimes make a surprising difference in radio performance.
With Homey’s tools, you can see if a device frequently drops offline or responds slowly, which is a clear sign that your mesh design needs a small adjustment.
Device Placement in Real Homes
In real life, you rarely get to place devices in perfect grid patterns. Instead, you work with existing outlets, switch boxes and furniture. Following a few practical rules helps you build a better Z-Wave mesh:
- Try to avoid hiding routing devices completely behind large metal objects or dense walls. Putting a plug behind a metal cabinet or server rack can reduce its effectiveness.
- Spread out routing devices so that there’s overlap in coverage. Two smart plugs in opposite corners of a floor usually help more than stacking multiple devices in one location.
- Place at least one routing device near clusters of battery devices. If you have several sensors in one area, ensure there’s a nearby powered device for them to “talk” to.
With Homey, you can use its built-in device health and developer tools to see if nodes are responsive and adjust placement if needed.
Conclusion: A Strong Mesh is Built, Not Bought
There is no magic hardware that automatically guarantees a perfect Z-Wave network. Instead, you build strength by combining many small, sensible choices: enough routing devices, smart placement, and occasional tweaks based on real-world behavior. By focusing on a solid backbone of mains-powered repeaters, you create an environment where every sensor and switch can perform at its peak.
This hands-on approach to network design is the most effective way to eliminate latency and connection drops. While the Z-Wave protocol handles the technical routing, your strategic placement of devices provides the physical infrastructure it needs to thrive. Building a robust mesh allows you to iterate calmly and ensures your Homey smart home remains responsive as it grows.
Smart home technologies and platforms supported by Homey
Smart homes often use multiple wireless technologies and platforms. As a powerful smart home hub, Homey supports a wide range of communication standards, including Zigbee, Z-Wave, Matter, Thread, KNX, 433 MHz, Wi-Fi, Bluetooth and Infrared.
Homey also integrates with popular smart home platforms such as Amazon Alexa, Google Home and Apple Home. By combining multiple technologies and platforms in one system, Homey allows devices from different ecosystems to work together in one flexible smart home setup.
FAQ
How many Z-Wave repeaters do I need?
There’s no fixed number, but most homes benefit from having at least one routing device per floor and a few extra in key rooms and corridors.
Do battery-powered devices help the mesh?
Usually not. Most battery-powered devices sleep to save energy and do not forward messages.
Does it matter where Homey Pro is placed?
Yes. A central, open location often gives better coverage than hiding it in a metal cabinet or corner of the house.
Should I include devices close to Homey first?
It can help, but it’s not critical. The network can heal and update routes later, especially as you add more routing devices.
How do I know if my mesh is weak?
Typical signs are slow responses, devices that go offline frequently, or sensors that sometimes don’t trigger Flows. These issues in a specific area often point to mesh gaps.
Can moving one smart plug really fix a whole area?
Yes, sometimes placing a routing device in a better “bridging” position unlocks a whole cluster of devices behind it.
Do I need routing devices in every room?
Not necessarily. Many homes work fine with routing devices in shared spaces that serve multiple rooms.
What if I rearrange my furniture or move devices?
The mesh adapts over time. If you notice new issues after changes, adding or repositioning one routing device can usually restore stability.
Does a Z-Wave repeater need to be special hardware?
No. Any mains-powered Z-Wave device typically acts as a repeater, including plugs, switches and many thermostats.
Will adding more devices always help?
Adding more well-placed routing devices helps. Adding many battery sensors without improving the backbone usually doesn’t.
Glossary
Routing Device
A routing device is a Z-Wave node that stays powered and forwards messages for other devices. Smart plugs, in-wall modules and many mains-powered thermostats act as routing devices. They are the building blocks of your mesh backbone.
Battery Device
Battery devices are Z-Wave nodes that run on batteries and wake only when needed. They usually don’t repeat messages, which helps them save energy. Their reliability depends heavily on having nearby routing devices.
Z-Wave Backbone
The backbone is the underlying structure of routing devices that carry messages across your home. A solid backbone means messages have multiple paths and can reach distant devices reliably. You build this backbone by placing powered Z-Wave devices in strategic locations.
Z-Wave Coverage
Coverage describes how well your Z-Wave signals reach different parts of the home. Good coverage means devices can communicate without frequent timeouts or retries. Coverage is improved by adding routing devices and positioning them thoughtfully.
Z-Wave Network Healing
Network healing is the process of Z-Wave nodes discovering and using better routes over time. When you add or move devices, the network slowly updates its paths. This means your mesh is not fixed forever after inclusion.
Network Floor Planning
Floor planning means designing your Z-Wave mesh by considering each floor and zone. Instead of treating devices individually, you aim for at least one good routing device per floor and key hallway corridors. This approach simplifies network design in multi-level homes.
Device Health
Device health is an overview of how responsive and stable a device is. In Homey, you can see whether devices are online, how they respond and if they’ve reported recently. This information helps you spot where mesh design needs improvement.
Interference
Interference occurs when other objects or signals affect radio communication. Thick concrete, metal structures and some electrical systems can weaken Z-Wave signals. Awareness of interference helps you choose better locations for routing devices.
