
Button +
Turn your Homey setup into a smarter, cleaner control center for the things you use every day.
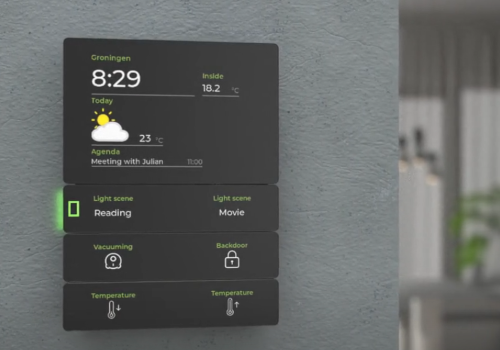
Button + makes it easy to build custom physical control panels that feel like a premium smart home dashboard instead of a jumble of toggles and pages. With a Button + panel, you can put the controls you actually use in one place, show live status at a glance, and make your home feel more polished and intuitive.
Why Button + is worth it
1. One touch control for your most important devices and scenes.
2. Quick visual feedback with custom labels, status text, and live display values.
3. A cleaner wall mounted smart home experience without digging through menus.
4. Flexible layouts for buttons, displays, and grouped panels.
5. Faster daily use for routines such as lighting, climate, security, and media.
6. A modern, customizable look that blends into your home and hardware setup.
Quick setup
1. Install the app on your Homey.
2. Open the Button + App settings / Configuration page in Homey.
There are three main configuration areas in the app.
1. Button bar configurations.
2. Display configurations.
3. Group configurations.
Each configuration area has a set of slots for building your panel layouts. The button bar configurations are used for the control buttons, the display configurations are used for the panel display, and the group configurations let you combine them into a complete Button + panel setup.
Setting up button bar configurations
1. Select Button bar Configurations from the first drop list.
2. Select a configuration number to edit. This number can later be assigned to a Button+ panel.
3. Under Left button bar are the options for the button on the left side of the Button+ button bar.
4. Select a Homey device that you want to control from the drop list. The panels support boolean capabilities, although filtering is still being improved.
5. Select a capability from the drop list.
6. Enter a Top Label if you want one. This is displayed in green on the button display.
7. Enter a Label. This is shown in white and in a larger font on the button display, just below the Top Text.
8. Repeat the steps for the Right button bar.
9. Click the Save Configurations button.
Setting up display configurations
1. Select Display Configurations from the first drop list.
2. Select a configuration number to edit. This can later be assigned to a Button+ display.
3. Click New Display Item.
4. Select a Device.
5. Select a Capability.
6. Edit the Label if required.
7. Edit the Units if required. This is text only and does not change the values sent to the display.
8. Enter the X and Y positions. These are percentages of the display width and height.
9. Enter a width. This is again a percentage of the display width.
10. Enter a Rounding value. 0 means whole numbers, 1 means 1 decimal place, and so on.
11. Select a Font Size from the list.
12. Add more display items as required.
13. Click Save Configurations.
Setting up groups
Groups are the easiest way to define a complete physical Button + panel. A group represents one finished panel layout and can combine:
1. one display configuration.
2. one or more button bar / connector configurations.
3. a custom name for the panel.
To set up a group:
1. Open the Group Configurations tab in the app settings.
2. Select an existing group or click the + button to create a new one.
3. Give the group a name such as Living Room Panel or Main Hallway Panel.
4. Choose the display configuration to assign to that group.
5. Assign one or more connector or button configurations to the group.
6. Use the preview area to review the full panel layout before saving.
7. Duplicate or delete groups as needed if you want multiple panel layouts.
This is useful when you want different physical panels in different rooms or for different purposes while reusing the same display and button presets.
Adding a device to Homey
1. Select the New Device option in Homey.
2. Select Button button bar.
3. Click Connect.
4. You should then see the device listed, so select it and continue. The app currently uses the Name found under the General settings to identify the button bar. If the Button + is not found, you can try to add it manually by selecting the Manual option and entering the IP address.
5. The device will be added to Homey.
Using the Homey device
1. Open the device in Homey.
2. Open the second tab to view a list of configurations for the display and each connector.
3. Select the Display or a Connector number from the top drop list. Homey currently draws the Configuration list over the drop list, so it can be a pain to select what you want.
4. Select a Configuration number to apply to the Display / button bar connector.
5. The configuration is uploaded to the simulator, but you need to refresh the simulator to make it take effect. There is a button to the right of the Virtual Id to refresh the page.
6. You should now see the information you selected in the configuration displayed on the button bar.
7. You can click the buttons in the mini displays to toggle the capability in Homey.
The app has a built in MQTT broker, so no setup is required for that. However, it is possible to add one or more external MQTT brokers in the app settings page.
Read more ›